
Running Jenkins on Kubernetes – Complete Setup Experience
DevOps & Cloud Engineer — building scalable, automated, and intelligent systems. Developer of sorts | Automator | Innovator
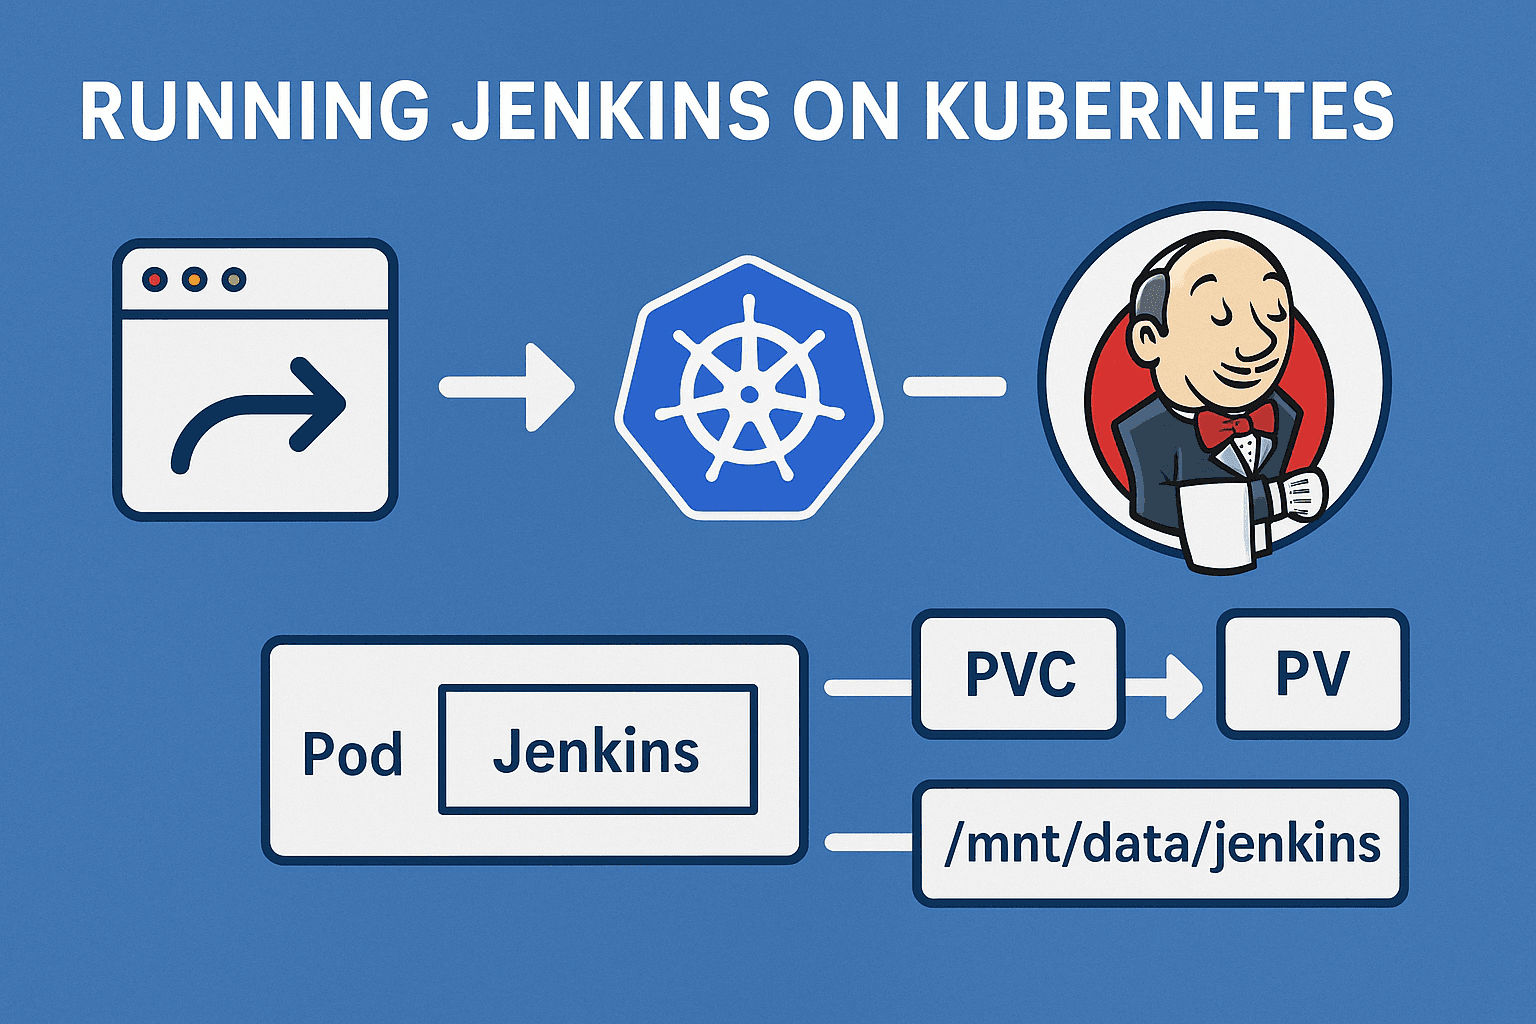
Running Jenkins on Kubernetes is one of those tasks that seems simple in theory but teaches a lot once you go through it. I wanted to host Jenkins in my cluster for CI workloads and learn how it behaves with persistent volumes, service accounts, and ingress exposure. This is how I set it up step by step.
Understanding the Goal
My objective was clear:
Deploy Jenkins in a dedicated namespace.
Persist Jenkins data using a local PersistentVolume.
Run Jenkins on a worker node, not on the control plane.
Expose Jenkins externally through an NGINX ingress using my domain.
Since I already had an ingress setup with MetalLB and a domain configured through Pangolin tunnel, Jenkins exposure had to follow the same model as my existing services.
You can check out my previous blog for this setup!
https://blog.nyzex.in/exposing-kubernetes-services-over-the-internet-using-metallb-nginx-ingress-and-pangolin
Setting up the Namespace and Storage
The first step was to prepare the storage layer. Jenkins requires persistent data for plugins, jobs, and configurations, so I decided to use a local PersistentVolume that maps to a directory on one of my worker nodes.
Below is the YAML I used for the storage setup:
kind: StorageClass
apiVersion: storage.k8s.io/v1
metadata:
  name: local-storage
provisioner: kubernetes.io/no-provisioner
volumeBindingMode: WaitForFirstConsumer
---
apiVersion: v1
kind: PersistentVolume
metadata:
  name: pv-jenkins
  labels:
    type: local
spec:
  storageClassName: local-storage
  capacity:
    storage: 20Gi
  accessModes:
    - ReadWriteOnce
  local:
    path: /mnt
  nodeAffinity:
    required:
      nodeSelectorTerms:
        - matchExpressions:
            - key: kubernetes.io/hostname
              operator: In
              values:
                - talos-1to-jsz
---
apiVersion: v1
kind: PersistentVolumeClaim
metadata:
  name: pvc-jenkins
  namespace: jenkins
spec:
  storageClassName: local-storage
  accessModes:
    - ReadWriteOnce
  resources:
    requests:
      storage: 10Gi
Here, talos-1to-jsz is my worker node where the Jenkins pod must run. The PV uses the local path /mnt, and the PVC binds to it successfully. Using WaitForFirstConsumer ensures that the PVC only binds when the pod is scheduled.
Configuring the Service Account and RBAC
Jenkins often needs to interact with the Kubernetes API for jobs and dynamic agent provisioning. To make sure it had sufficient access, I created a service account with a ClusterRole and a ClusterRoleBinding.
apiVersion: rbac.authorization.k8s.io/v1
kind: ClusterRole
metadata:
  name: admin-jenkins
rules:
  - apiGroups: [""]
    resources: ["*"]
    verbs: ["*"]
---
apiVersion: v1
kind: ServiceAccount
metadata:
  name: admin-jenkins
  namespace: jenkins
---
apiVersion: rbac.authorization.k8s.io/v1
kind: ClusterRoleBinding
metadata:
  name: admin-jenkins
roleRef:
  apiGroup: rbac.authorization.k8s.io
  kind: ClusterRole
  name: admin-jenkins
subjects:
  - kind: ServiceAccount
    name: admin-jenkins
    namespace: jenkins
This gave Jenkins full administrative access to the cluster, which is acceptable for a controlled environment. In production, it is recommended to restrict permissions according to actual needs.
Deploying Jenkins
With storage and RBAC in place, I created the deployment for Jenkins. The image used was jenkins/jenkins:lts. I ensured that the pod always runs on the worker node and uses the persistent volume claim for /var/jenkins_home.
apiVersion: apps/v1
kind: Deployment
metadata:
  name: deployment-jenkins
  namespace: jenkins
spec:
  replicas: 1
  selector:
    matchLabels:
      app: server-jenkins
  template:
    metadata:
      labels:
        app: server-jenkins
    spec:
      securityContext:
        fsGroup: 1000
        runAsUser: 1000
      serviceAccountName: admin-jenkins
      nodeSelector:
        kubernetes.io/hostname: talos-1to-jsz
      containers:
        - name: deployment-jenkins
          image: jenkins/jenkins:lts
          resources:
            limits:
              memory: "2Gi"
              cpu: "1000m"
            requests:
              memory: "500Mi"
              cpu: "500m"
          ports:
            - name: httpport
              containerPort: 8080
            - name: jnlpport
              containerPort: 50000
          livenessProbe:
            httpGet:
              path: "/login"
              port: 8080
            initialDelaySeconds: 90
            periodSeconds: 10
          readinessProbe:
            httpGet:
              path: "/login"
              port: 8080
            initialDelaySeconds: 60
            periodSeconds: 10
          volumeMounts:
            - name: data-jenkins
              mountPath: /var/jenkins_home
      volumes:
        - name: data-jenkins
          persistentVolumeClaim:
            claimName: pvc-jenkins
Once deployed, the pod initially went into a Pending state because the PersistentVolume node affinity did not match. After correcting the hostname to talos-1to-jsz, it started running successfully.
Creating the Service
To expose Jenkins internally, I created a simple ClusterIP service. This would later be used by the ingress controller.
apiVersion: v1
kind: Service
metadata:
  name: service-jenkins
  namespace: jenkins
spec:
  selector:
    app: server-jenkins
  type: ClusterIP
  ports:
    - port: 8080
      targetPort: 8080
At this point, I verified that the service correctly routed traffic to the pod. For a quick test, I used port forwarding:
kubectl port-forward -n jenkins deployment/deployment-jenkins 8080:8080
Opening http://localhost:8080 brought up the Jenkins setup page.
Unlocking Jenkins
During the first startup, Jenkins requires an administrator password stored inside the container. The message on the web interface pointed to the file /var/jenkins_home/secrets/initialAdminPassword. I retrieved it using:
kubectl exec -it -n jenkins deployment/deployment-jenkins -- cat /var/jenkins_home/secrets/initialAdminPassword
After entering this password in the web interface, Jenkins allowed me to continue the setup and install the recommended plugins.
Exposing Jenkins through Ingress
Once Jenkins was fully functional, I exposed it externally using my NGINX ingress controller. Since I already had MetalLB and a working ingress for another service (kubenav), I followed the same pattern.
apiVersion: networking.k8s.io/v1
kind: Ingress
metadata:
  name: jenkins
  namespace: jenkins
  annotations:
    nginx.ingress.kubernetes.io/rewrite-target: /
spec:
  ingressClassName: nginx
  rules:
    - host: jenkins.nyzex.in
      http:
        paths:
          - path: /
            pathType: Prefix
            backend:
              service:
                name: service-jenkins
                port:
                  number: 8080
After applying this and pointing my DNS entry jenkins.nyzex.in to the MetalLB IP of my ingress controller, I was able to access Jenkins directly at:
http://jenkins.nyzex.in
It loaded perfectly through the ingress, confirming that the setup worked as intended.


Now we have jenkins ready to use!
Conclusion
This exercise helped me understand how Jenkins interacts with Kubernetes components such as PersistentVolumes, ServiceAccounts, and Ingress controllers. It also emphasized the importance of node affinity in local storage setups, especially when working with Talos nodes.
With this configuration, Jenkins runs reliably on my worker node, stores its data persistently, and is accessible through my domain managed via MetalLB and Pangolin. The next step will be to integrate Jenkins with GitHub and container registries to build a complete CI workflow.