
Automating Virtual Machines on Proxmox with Terraform
DevOps & Cloud Engineer — building scalable, automated, and intelligent systems. Developer of sorts | Automator | Innovator
Managing virtual machines manually on Proxmox is straightforward for one or two servers, but as soon as you start spinning up multiple nodes, automation becomes essential. This is where Terraform shines. In this blog, I will share my journey of provisioning Talos virtual machines on a Proxmox host using Terraform, entirely declaratively, with the Proxmox API accessed securely over a Pangolin tunnel.
Installing Terraform on macOS
Terraform is a command-line tool for building, changing, and versioning infrastructure safely and efficiently. On macOS, the easiest way to install Terraform is via Homebrew:
brew tap hashicorp/tap
brew install hashicorp/tap/terraform
After installation, verify it is working:
terraform version
You should see the installed version displayed. Terraform is now ready to manage your infrastructure.
Why Terraform with Proxmox?
Terraform allows you to describe your infrastructure as code. Instead of clicking through the Proxmox web interface, you define VMs, disks, networks, and other resources in .tf files. Terraform can then apply, update, or destroy these resources automatically.
For Proxmox, we are using the Telmate provider (Telmate/proxmox), which interacts with Proxmox via its REST API. The official documentation for the VM resource can be found here:
Terraform Proxmox VM_QEMU Resource
This documentation is invaluable for understanding all the supported arguments and disk/network options.
Environment Setup
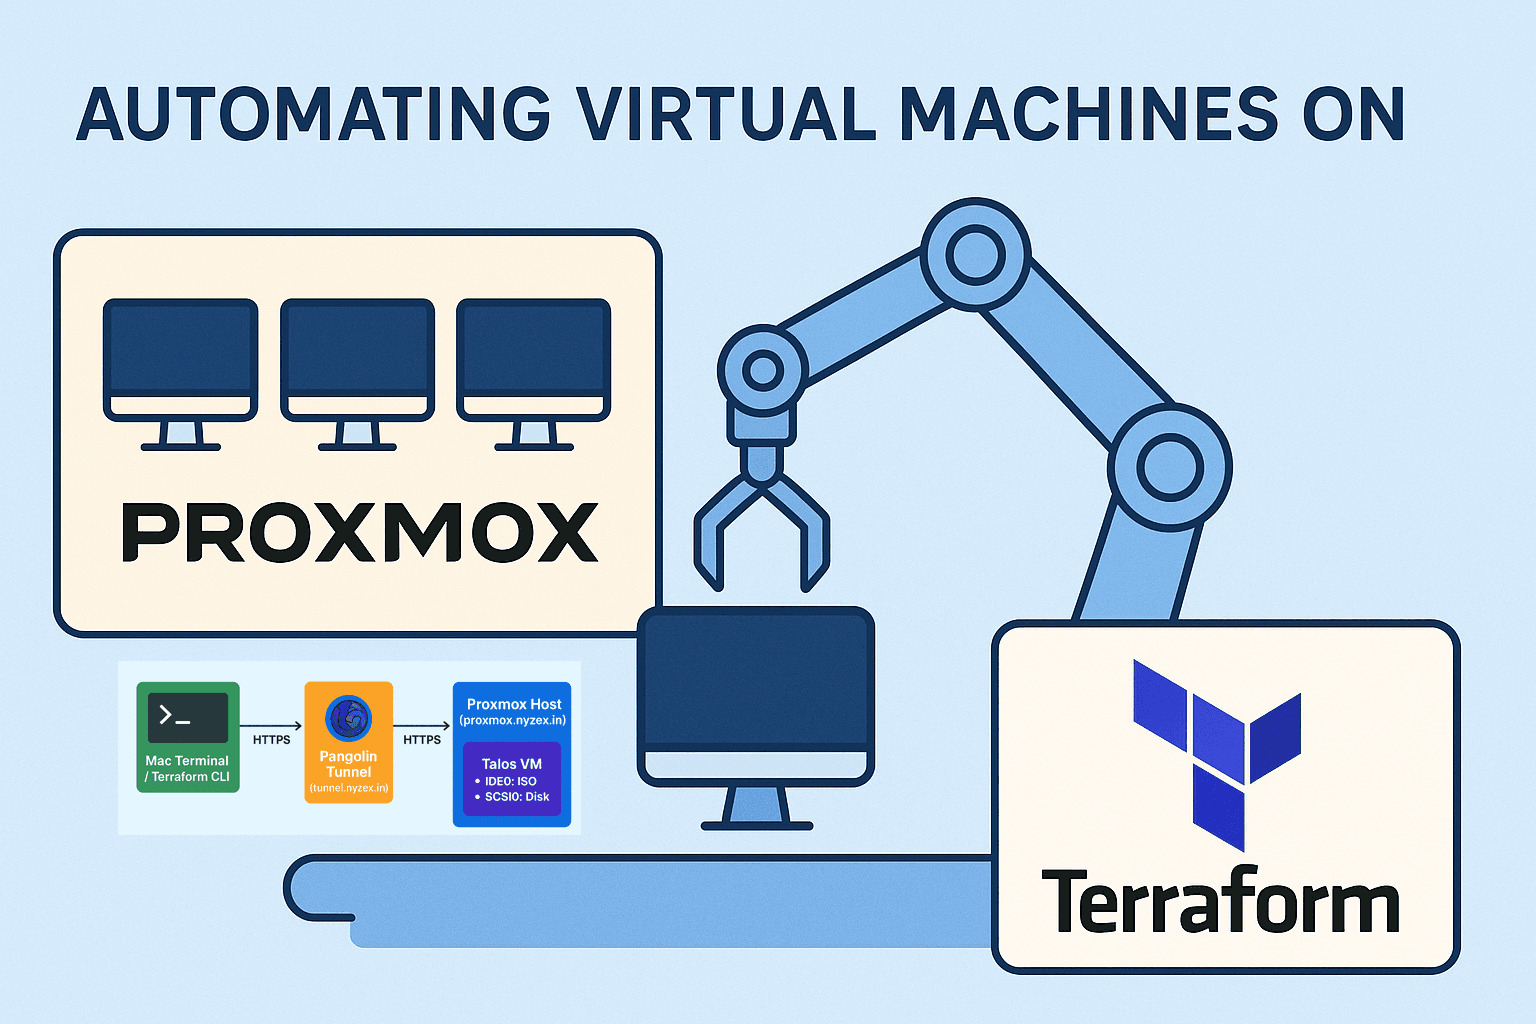
My Proxmox host is securely exposed through a Pangolin tunnel. This allows me to access the Proxmox API remotely without exposing it publicly. If you want to understand how to set up the tunnel, I wrote detailed guides earlier:
With the tunnel in place, I can interact with https://proxmox.nyzex.in safely by configuring Pangolin resource.

Terraform on your Mac runs
init,plan, andapply.Terraform uses the Telmate Proxmox provider to talk to the Proxmox API.
Communication is done securely via the Pangolin tunnel at
tunnel.nyzex.in.Proxmox provisions the VM:
ISO is mounted on IDE0 for boot/install.
Main disk is created on local-lvm (32 GB, raw format).
VM network is attached to vmbr0.
VM boots from ISO, ready for Talos installation
Uploading the Talos ISO
Before creating the VM with Terraform, I manually uploaded the Talos ISO to the Proxmox ISO storage:
/var/lib/vz/template/iso/metal-amd64.iso
This avoids network download issues and ensures Terraform can mount the ISO during VM creation.
Terraform Configuration Files
The Terraform configuration consists of two main files: main.tf and vm.tf.
main.tf
This file sets up the Terraform provider and authentication with Proxmox:
terraform {
  required_providers {
    proxmox = {
      source  = "Telmate/proxmox"
      version = "3.0.2-rc04"
    }
  }
  required_version = ">= 1.0"
}

provider "proxmox" {
  pm_api_url      = "https://proxmox.nyzex.in/api2/json"  # Proxmox API endpoint via Pangolin
  pm_user         = "root@pam"                             # Proxmox user
  pm_password     = "super-secret-password"               # Proxmox password
  pm_tls_insecure = true                                   # Ignore TLS certificate warnings
  pm_debug        = true                                   # Enable debug logging
}
This provider block ensures Terraform can authenticate with Proxmox through the API.
vm.tf
This file defines the Talos virtual machine with proper boot order, disks, and network configuration:
resource "proxmox_vm_qemu" "talos_vm" {
  name        = "talos-terraform-test"       # VM name
  target_node = "my-pve1"                  # Proxmox node to deploy on
  bootdisk    = "ide0"                       # Boot from CD-ROM first
  onboot      = true                          # Start VM automatically
  agent       = 1                             # Enable QEMU guest agent
  boot        = "order=ide0;scsi0;net0"     # Boot order: CD-ROM, then main disk, then network

  cpu {
    cores   = 2
    sockets = 1
  }

  memory = 2048                               # RAM in MB

  # Disks
  disks {
    ide {
      ide0 {
        cdrom {
          iso = "local:iso/metal-amd64.iso"   # ISO path in Proxmox storage
        }
      }
    }
    scsi {
      scsi0 {
        disk {
          storage = "local-lvm"              # VM disk storage
          size    = "32G"                     # Disk size
          format  = "raw"                     # Disk format
        }
      }
    }
  }

  # Network interface
  network {
    id     = 0
    model  = "virtio"
    bridge = "vmbr0"                         # Connect to Proxmox bridge
  }
}
How it Works
Terraform provisions the VM on Proxmox using the API.
The ISO is mounted on the IDE0 CD-ROM drive.
The main VM disk is created on
local-lvm.Network interface is attached to
vmbr0.The VM boots from the CD-ROM first, allowing Talos installation onto the main disk.
Once installation is complete, the boot disk can be changed to scsi0 to boot directly from Talos without the ISO.
Applying the Terraform Configuration
After creating the .tf files:
terraform init       # Initialize Terraform and download providers
terraform plan       # Review planned actions
terraform apply      # Apply configuration and provision the VM

Terraform will create the VM, mount the ISO, and configure the disk and network. You can then open the Proxmox console to complete the Talos installation.
After apply, you might get an error:

Not to fear! because if you navigate to your proxmox, you will see that your VM was actually created properly, weird but okay XD
Conclusion
Terraform allows fully automated provisioning of Talos virtual machines on Proxmox. Combined with the Pangolin tunnel, it provides a secure and reproducible workflow. Once configured, you can scale to multiple nodes and manage your Talos Kubernetes clusters entirely through code.
This setup is ideal for anyone running home labs, secure development environments, or experimental Kubernetes clusters, and it ensures consistency and repeatability across deployments.